Setting up IMAP Email

Contents
› Web App
› To Set up IMAP Email in Microsoft Outlook for Windows
› To Set up IMAP Email in Windows Live Mail
› To Set up IMAP Email in Mac Mail
› To Set up IMAP Email in Outlook for Mac
› To Set up IMAP Email on your iPhone or iPad
› To Set up IMAP Email on your Android Device
Windows - for a Windows computer you can use the Web App, Microsoft Outlook or Windows Live Mail.
Apple Mac - IMAP email is compatible with Mac Mail and Outlook for Mac.
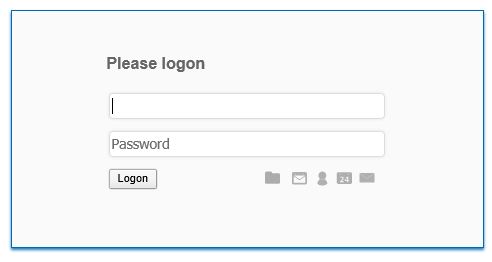
1. To access the web app open a web browser and in the address bar type, mail.securesuite.io
2. You will see the login screen, enter your email address and password, click on Logon
3. You will now see the main email screen
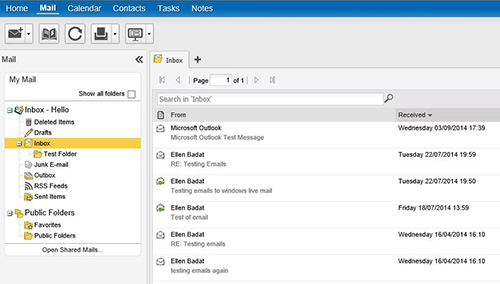
From this screen you can access your email, calendar, contacts, tasks and notes.
If you need any help learning the web app interface, please get in touch and we will be happy to help.
To Set up IMAP Email in Microsoft Outlook for Windows
These images are from Outlook 2013, however the basic information will be the same for previous versions of Outlook.
1. Close Outlook
2. Go to Control Panel and select Mail
3. Click Email Accounts
4. Click New Account
5. Select “Manual setup or additional server types”
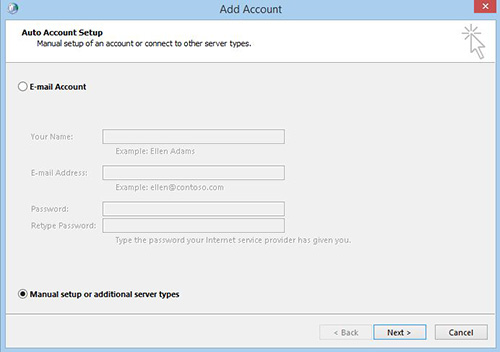
6. Click Next
7. Select “POP or IMAP”
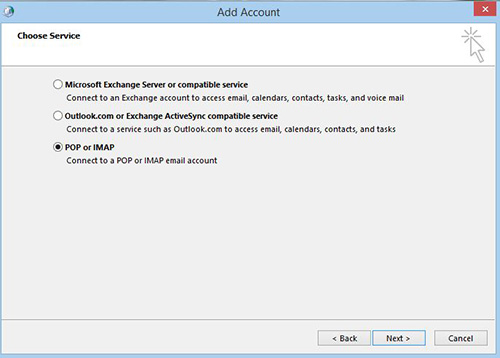
8. Click Next
9. Fill in your details
Server information -
Account type: IMAP
Incoming mail server: mail.securesuite.io
Outgoing mail server: mail.securesuite.io
User Name: your email address
Password: your password
Put a tick in "Remember password"
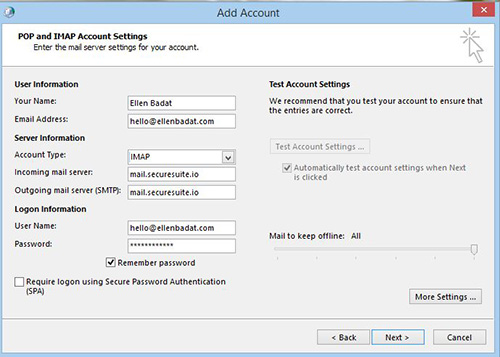
10. Click on “More Settings”
11. On the “Outgoing Server” tab, put a tick in the box saying “My outgoing server (SMTP) requires authentication”. The circle next to “Use same settings as my incoming mail server” should be blacked out

12. On the “Advanced” tab, change the encrypted connection to SSL for incoming and TLS outgoing. The outgoing server port needs to be changed to 587
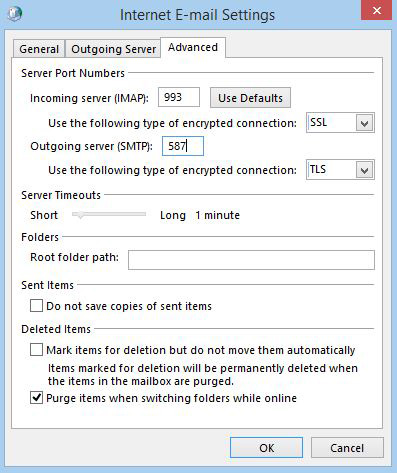
13. Click OK
14. On the “Add Account” window, click Next
15. Outlook will check in the incoming and outgoing settings
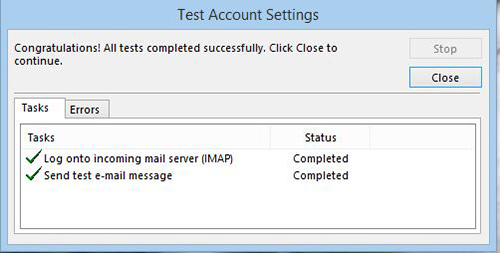
16. Click on Close
17. Click on Finish
18. Close the Mail window
19. Close Control Panel
20. Open Outlook
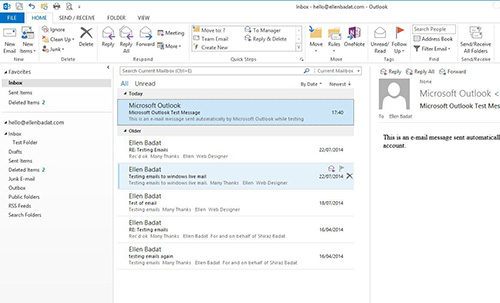
21. Outlook will start to download all of your email
To Set up IMAP Email in Windows Live Mail
1. Open Windows Live Mail
2. Select Accounts at the top
3. Click on Email
4. Fill in your details
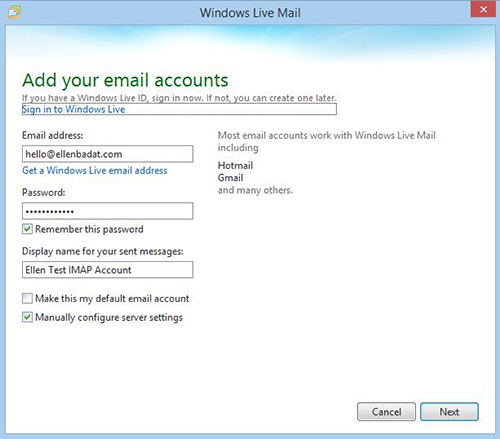
5. Put in tick in the box saying “Manually configure server settings”
6. If you have more than one account and want to make this new account your default email account, put a tick in the box “Make this me default email account”
7. Click Next
8. Complete the server information
Incoming server information -
Server type: IMAP
Server address: mail.securesuite.io
Put a tick in the box "Requires a secure connection (SSL)"
Authenticate using: Clear text
Logon user name: your email address
Outgoing server information -
Server address: mail.securesuite.io
Port: 587
Put a tick in the box "Requires a secure connection (SSL)"
Put a tick in the box "Requires authentication"
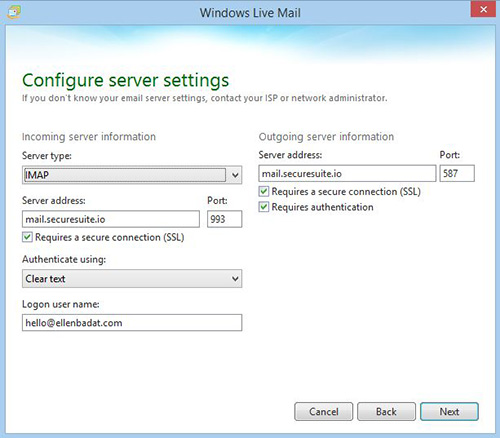
9. Click Next
10. You should receive a message saying your email account was added
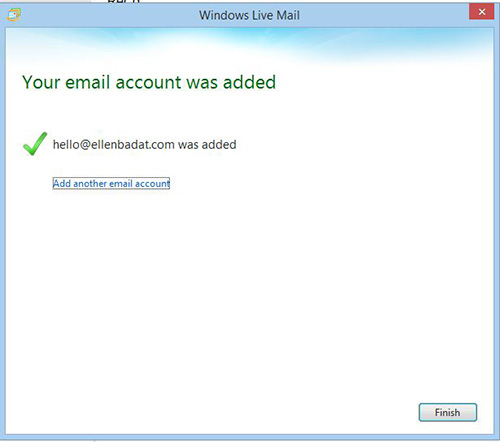
11. Click finish
12. Windows Live Mail should start downloading your email
13. Check that you can send email by sending a message to someone you know.
To Set up IMAP Email in Mac Mail
1. Open Mail
2. Go to Preferences
3. On the Accounts tab, click the + at the bottom left corner of the window
4. Select “Add Other Mail Account…”

5. Click Continue
6. Enter your details

7. Click Create
8. Mail will try to discover settings and then say, “ Account must be manually configured”
9. Click Next
10. Make sure IMAP is in blue at the top and enter the information
Mail Server: mail.securesuite.io
User Name: your email address
Password: your password

11. Click Next
12. Mail with verify the details
13. Enter the Outgoing Mail Server info
Mail Server: mail.securesuite.io
User Name: your email address
Password: your password

14. Click Create
15. Mail will verify the settings
16. Mail will say “Additional account information required”
17. Click Next
18. Confirm the Outgoing Mail Server Info
Port: 587
Use SSL: This should be ticked
Authentication: Password
19. Click Create
20. Mail should start downloading your email

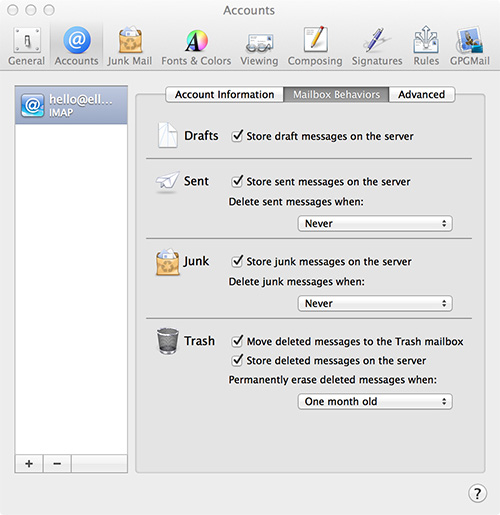
The Accounts pages should look like this, with your information setup and configured.

To Set up IMAP Email in Outlook for Mac
1. Open Outlook for Mac
2. Go to Preferences
3. Click on Accounts
4. Select Other Email
5. Enter your email address and password
6. Complete the rest of the details
User Name: your email address
Type: IMAP
Incoming Server: mail.securesuite.io
Tick the box saying “Use SSL to connect (recommended)”
Outgoing Server: mail.securesuite.io
Tick the box saying “Use SSL to connect (recommended)”

7. Click Add Account
8. Outlook should add the account, after about 30 seconds Outlook should start downloading your email
9. Click on the More Options button below Outgoing Server
10. Change the drop down menu to say “Use Incoming Server Info”
11. Click Ok

12. Click on the Advanced button
13. On the Server tab, change “Sync all IMAP folders every 2 minutes” to every 5 minutes

14. The Folders tab should look like this

15. Click Ok
16. Close the Accounts window
17. Outlook should start downloading your email

To setup your IMAP email on your iPad or iPhone
iPhones and iPads follow the same setup procedure. Depending on which version of IOS your device is using the screen may look slightly different from the pictures below.
1. Go into Settings
2. Then Mail, Contacts, Calendars
3. Click Add Account
4. Select Other
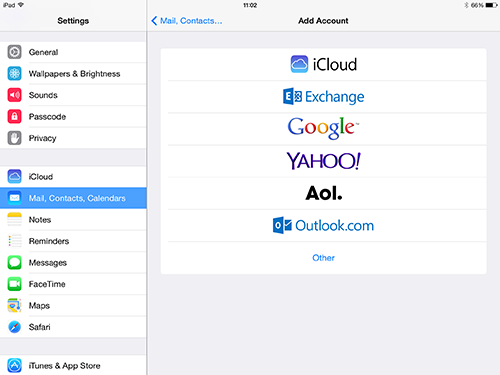
5. Click Add Mail Account
6. Enter the account information:
Name: your name
Email: your email address
Password: your password
Description: give your account a memorable name
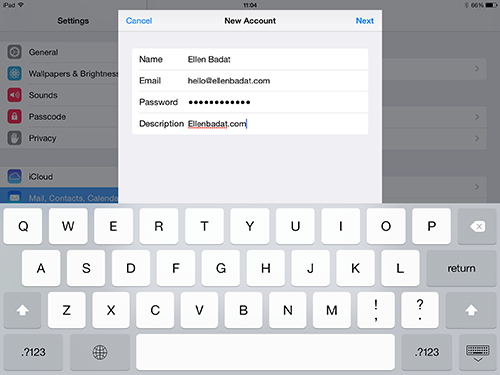
7. Click Next
8. You will need to enter additional information
9. Make sure IMAP is selected at the top of the screen
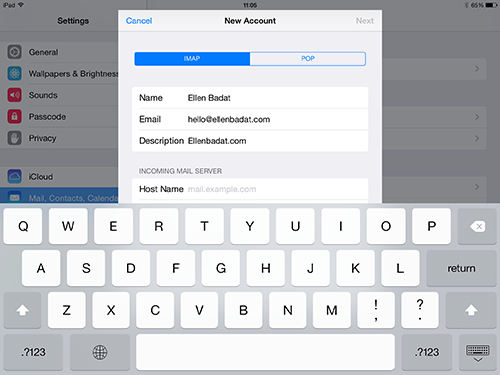
10. Incoming Mail Server:
Host Name: mail.securesuite.io
Username: your email address
Password: your email password

11. Outgoing Mail Server:
Host Name: mail.securesuite.io
Username: your email address
Password: your email password
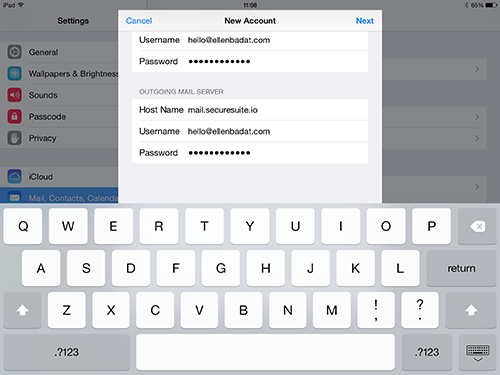
12. Click Next
13. It will say “Verifying”
14. The new account will then be added
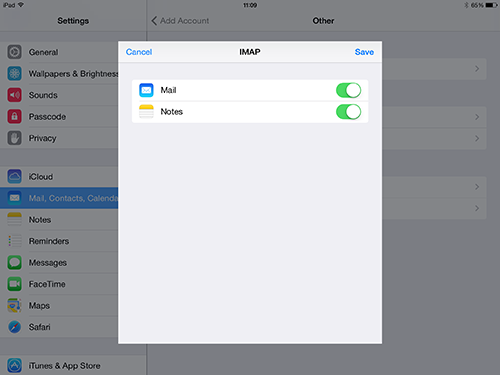
15. Click Save
16. The device will add the account and return you to the Mail, Contacts, Calendars screen
17. Click on the new account that you just setup
18. Click on the Account at the top
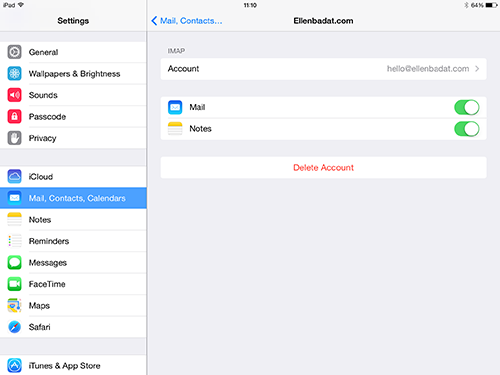
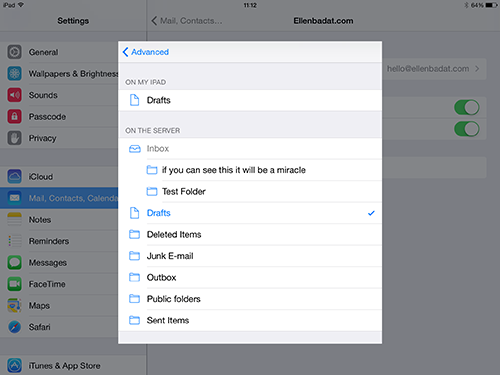
19. Click on Advanced at the bottom of the window

20. Under the heading “Mailbox Behaviors”
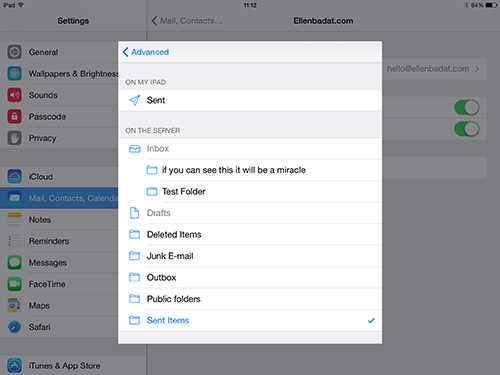
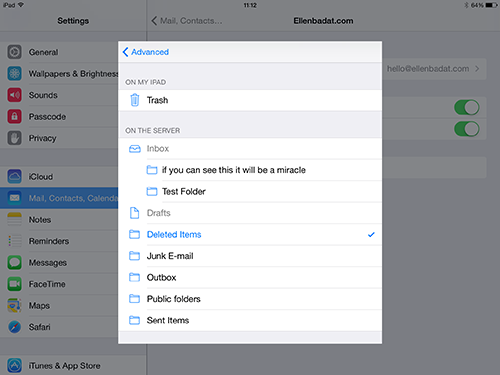
21. Click on the mailboxes, Drafts, Sent and Deleted, change the tick so that it is next to the corresponding folder under “On the Server”
22. Click Account in the top left corner
23. Then click Done in the top right corner
24. Click on Mail, Contacts… in the top left corner of the window
25. Press the Home button (the round button on the device at the bottom)
26. Go into the Mail application
27. The new account should be listed under “Mailboxes” and the device should start downloading your email that you have stored on the server.
To Set up IMAP Email on your Android Device
Android devices vary in the setup procedure needed to configure the IMAP email account. However the basic details you will need are:
› Your email address/username
› Your password
› The server type is IMAP
› The incoming and outgoing mail server is mail.securesuite.io
› Use SSL should be ticked or selected
› Outgoing Mail Port should be 587
The following show the setup procedure on a Nexus 7 device using Android 4.4.4 (Kitkat)
1. Go into Settings
2. Scroll down to Accounts and click Add Account
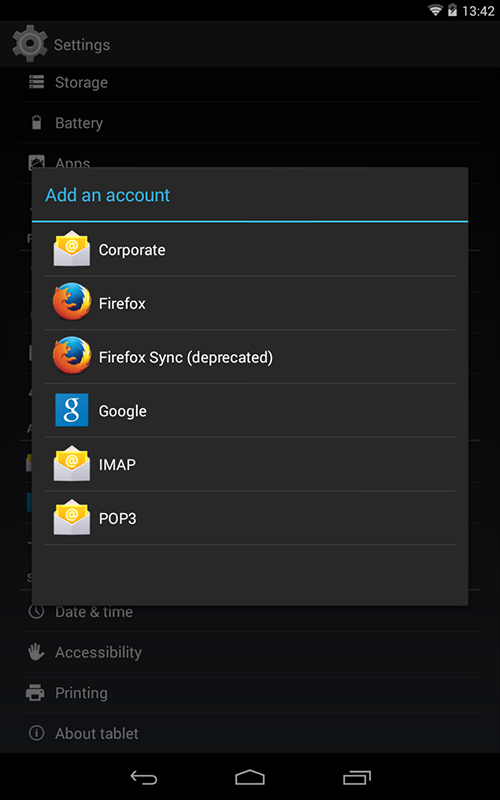
3. Select IMAP from the list
4. Enter your email address and password
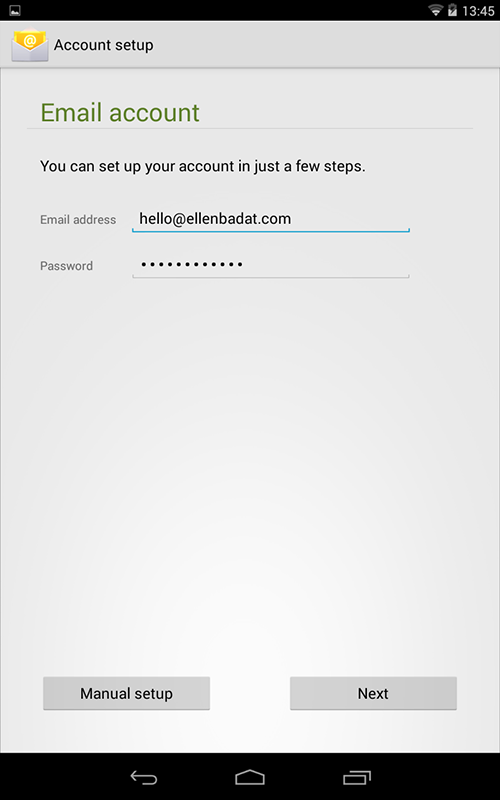
5. Click Next
6. Select IMAP

7. Change the Server to mail.securesuite.io
8. Change the security type to SSL/TLS (Accept all certificates)
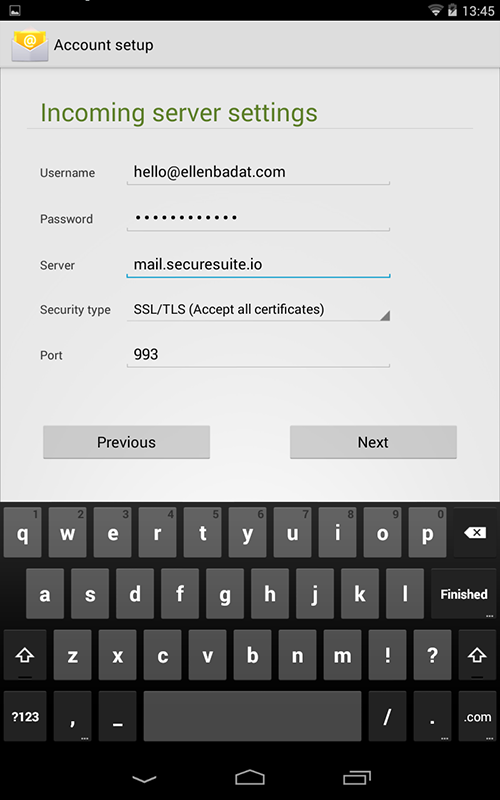
9. Click Next
10. For the Outgoing settings change the security type to START TLS (Accept all certificates)
11. Make sure the box next to Require sign-in is ticked
12. Click Next
13. The device will verify the settings
14. Amend your Account Options as needed
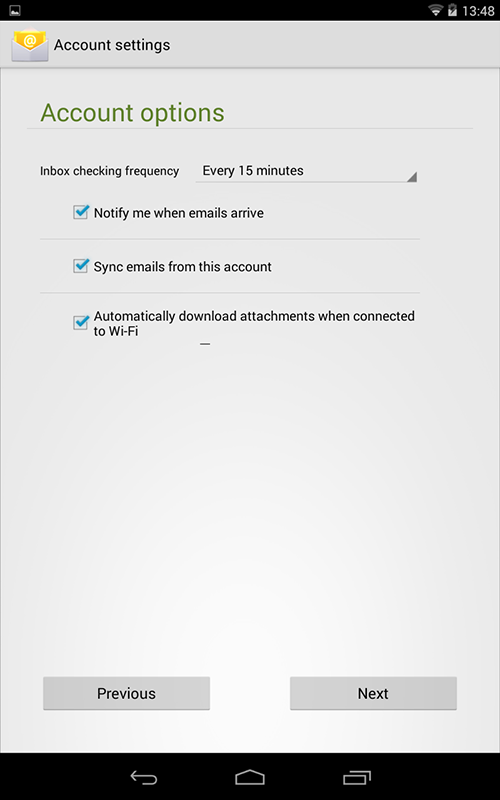
15. Click Next
16. Give the account a memorable name
17. Click Next
18. The account will now be setup
19. You should now be taken back to the Settings window
20. Click the Home button at the bottom of the screen
21. Go into the Email Application
22. Select the email account and your email should start to download
If you need help setting up the IMAP account on your particular device please get in touch.